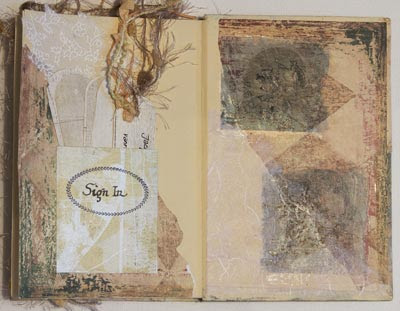
We just started a new Altered Book Round Robin on ABEurope. This time the theme is 'journey' . It is a fun theme and one can work it out in so many different ways. I had loads of ideas and settled for a book about a young girl who is dreaming up her journeys to countries and cities around the world to go to see and explore art and architecture.
This is the first time that I sent out a book with the covers not completely finished - but on the other hand, I finished 4 spreads in the book! And I really had to stop myself for doing more, or I would have been much too late.
The book is sent to France, will travel to Germany, England and Norway and then hopefully arrive safely in the Netherlands again!
Sunday, December 16, 2007
Wednesday, November 14, 2007
Short holiday in Scotland
My husband persuaded me to go to Scotland with him for a Meet with members of the Ephotozine.com website. This group of people all love landscape photography and most of them are so good at it!
Since the landscapes of my last visit in Skye were not that great, I thought that I would not fit in there very well. But I am glad that I did go. A friendly bunch of people, with all the same interest, fun atmosphere and a great location. It has been a fun (but tiring) weekend and I have really enjoyed the countryside there.
The last time I have ever seen a deer in the wild, in Holland was when I was about 10 years old. During our stay in Rowardennan, I saw 6 deers within these few days! One of them was a stag, a very proud one, and I was even able to take some pictures of him!
This was one of the photographs that I felt that was so typical of Glencoe. Rough mountains, moody weather and lots of drama.
Still processing the pictures that I shot in RAW format. And soon I will have to get my ALtered Book ready for the next Round Robin of ABEurope.....!
Tuesday, October 30, 2007
What to do with this book?
This book stood in a window of a secondhand bookshop in Den Bosch. I could not resist buying it.
This is the kind of book that was probably the pride and joy of the girl who received it. On the front, the coloured plate is glued into the bookboard. In the book several coloured plates are glued in the book.
We are so used to full coloured books and magazines, but years ago, this must have been a luxury!
The stories in the book seem so innocent, filled with morals and good endings - so far from what our daughters get to read in their magazines!
It is a pity that there is no date found, nowhere in the book. No referral to copyright. Guess no one was worrying about that, back then.
I bought it to alter, but on the other hand, I do like the covers so much - eventhough they are not that perfect. The pages are old, not that brittle, but for altering I need to remove some pages and glue some together.
This is the first time that I found it hard to get my hands at it and alter it. Can't even find a theme. Some suggestions???
Tuesday, October 16, 2007
House of Sacrifice
Setting my first babysteps in 3D.... This photocollage started with the rendering of a 3D model in the software program Poser. I then added various photographs to create the mood of my theme I am working on: Religion and Faith.
A few months ago I felt that I needed something else to put into my digital collages. Since then I have ideas to import rendered 3D objects into my digital collages because sometimes it is so frustrating to have not the right photographs to express my ideas.
A few years ago I had been dabbling with an old 3D program called Amapi that came free with Computer Arts magazine. These last months I have been reading manuals, books and experimenting with software like Vue Esprit, Amapi Pro 7.5, Poser 7 and just recently Carrara 6 Pro.
There is loads to learn, which I love - but on the other hand I still want to work with my hands, paint, paper, textiles and glue as well!
Too much hobbies - too little time. Nothing new under the sun, right?
Labels:
3D,
digital collage,
photograph,
Photoshop,
Poser
Tuesday, September 18, 2007
Favorite item on worktable
We had a question for the members of the ABEurope group (Yahoo group for Altered Books in Europe): what is your favorite item on your worktable?
Well, this is my favorite: a wirebasket with several jam jars filled with water!
My workroom is somewhat away from the nearest watertap. In the beginning I was running around with jars filled with water, to empty them or to change the water. I tried also larger jars as well. But as soon as the water is dirty, then even a large jar won't help!
I found this wirebasket in a store and thought that it would be perfect to hold several jars and filled with water. In the openings I can even tuck in some brushes that need more than a simple rinse in the waterjar.
One jar is dedicated to the glue brush. This is always the same jar in the same place. Now I don't have to think so much when I am using expensive watercolour brushes - which I definetly don't like to rinse in water mixed with glue!
Another bonus is that the cat can't throw the water jars over. I always had to clean up after working, afraid that Coco, who of course prefers my table above the comfortable chair in the same room, would throw a jar over my work.
Also, the jars are small enough so that she can't drink from them - she seems to like 'dirty' water more than a fresh bowl... Cats...
Sunday, August 19, 2007
Discharging fabric
Not much time to start working at real projects, so I took some time off and discharged some fabric. Very easy to do, does not take much time and I had all the supplies at home.
I did this on a warm, windy day. So the fabric took only 20 minutes to dry before I could repeat the process.
I used household bleach to discharge, had a bowl of water with vinegar to stop the bleaching process. And a bowl with water to rinse the fabrics.
To keep things easy, without fear of bleaching my workroom, I worked outside in te garden. The only problem I faced there was how to keep everything out of reach of Joy, my daughters Golden Retriever (who is white, actually, instead of gold), a very active, energetic dog full with creative ideas about investigating the world around her.
So I put the bowls on top of the large trashcans we have here in Holland.
I used some quilt fabric, an apart from the blue fabric, all discharged very well, except one blue piece - it would not bleach. That was probably real good quality quilting fabric!
I used clothes pegs and paperclips to hold the fabric, when I folded it. The paperclips formed these nice little patterns.
I learned that when I left the bleach too long outside of the bottle, it seemed to slow down the bleaching process. So I just poured a little bit in a shallow tray, dabbing with the fabric in it, or sometimes using an old brush (since the bristles are eaten away by the bleach) to makes some brush marks.
Then as the colour was fading away, the fabric was put in the bath with vinegar for a while. Then I rinsed it with water and hang up to dry in the wind.
There is not so much control over the whole process - but I guess that is the beauty of it. You just go along and accept the results.
This was so much fun to do - I will go through all my fabrics and see which ones I don't like anymore - they will be discharged too!
Here a close up from the patterns created by the paperclips.
Friday, July 27, 2007
Stealing time to create
The last weeks are filled with working in my daughter's house: stripping, plastering, sanding, prepping and painting. It seems to take ages, well it is taking ages to get the house done.
It was previously rented to an Afghan family and where they painted the walls blue (or yellow, or red or purple), they also took parts of the ceiling, doorposts, windowframes, central heating etc. with it.
So really most of our time is spent removing paint... And that takes more time than actually painting a room (after stripping the old wallpaper, filling the gaps, sanding and prepping).
Luckily I found some time and inspiration to work on this piece that was hidden in a pile of painted and collaged papers.
I added some Tyvek, ironed some cotton with Wonder Under to it and did some hand stitching.
It is not finished yet - I want to cut out a stamp and stamp over the work as well.
Since I come back home exhausted most of the time, I only get to work at it an hour or so now and then.
Boy, hope that the house get finished soon (but that can take another 3 weeks) and that I can use this summer to create in the garden.... Hmmm, what a wonderful thought!
Labels:
collage,
mixed media,
paper,
paper art,
stitching
Thursday, June 21, 2007
Page for Textile book 'Symbols and Signs'
For the True Colours Round Robin (textile book) on ABEurope group, I started with the theme 'Symbols and Signs' in the colours reds and purples.
The theme of symbols seems to pop up regurlarly in my life.
Two years ago, when we were on holiday in France and went to Honfleur, I bought a beautiful book of the artist Luciano Di Concetto. His work consists of calligraphy and his own designed symbols. This has already inspired me to make a little book with my own symbols in it.
You can find a photograph in this blog in the archive under the entry 'Signs and Symbols' in october 2005.
And then there is my fascination for the ancient Egyptian art, especially the murals, filled with little drawings depicting words. This began when I was 15 years old and did a project about the Egyptian kings for school.
Just recently I read 'Rosetta' , written by Barbara Ewing (a wonderful writer, I have now read all her books) in which the main character is fascinated by the Egyptian hieroglyphs as well.
I hope to use my own symbols in this textile book, but will use symbols from all around the world as well.
This first page is a very simple symbol: a X. The X symbol is filled with fibers, trapped between two layers of organza. The stitching around the symbol helps to make it more visible.
I intend to make loose pages in different techniques and then bind them together.
Tuesday, May 29, 2007
Textile Pages for True Colours Round Robin
These facric pages went to the UK for the first round of the True Colours Round Robin. This was the first time that I experimented with a thinner transfer of a photo copy.
The shells have been coloured with water colour crayons for some extra colour.
At the other side of the textile pages (to be folded) I tried water soluble Solvy for the first time. This was sewed to the page and some beads were added as well. This was a more abstract interpretation of the theme 'Colours of the sea'.
For the second round I made this square page. Layers of organza with fibers trapped in between the layers. Some sewing with the machine and some experimentation with the soldering iron - something I really need to practise...
Monday, May 21, 2007
Holiday on Skye in Scotland
We just returned from a holiday on the isle of Skye in Scotland. My husband photographs landscapes and I was hoping to give it a try myself.
Scotland is famous (and especially Skye) for its bad weather. A bit silly maybe, but we hoped for some moody skies and lots of clouds. Instead we got a week with loads of sunshine!
So the landscape images are not so dramatic as we hoped for - but we enjoyed the good weather and being out there.
All these pictures were taken from the beach of Elgol, a very rocky beach with different rock patterns and sorts, blue cool clean water and a breathtaking view on the Cuillin Hills on the other side of the Loch.
We stayed in Elgol, it is not really a village, just a place that has houses scattered over the hills, in a self catering chalet, attached to the house of the owners. From every window we had amazing views over the water, the hills and the little harbour.
See: http://www.gael.net/pierhouse/
The only downside was the single road track from Broadford to Elgol - it is a single road track that you have to take very seriously! There are loads of passing places, but you don't want to have to manouvre into one when there is only a few centimeters between the car and a abyss...
I managed to fill almost 4Gb cards with images during this trip. Scotland is a beautiful country and hopefully we will return in November for a meet with EPZ photographers near Loch Lomond.
Thursday, April 12, 2007
New Round Robin on ABEurope group
Front cover
Back cover
This month we will start a new Round Robin on the Yahoo ABEurope group, called 'True Colours'. There was a choice between altered books, tipins and fabric books. I did sign up for the two latter options.
For the tipins I choosed Black&White as colour and 'Typography and ornaments' as a theme. I altered a book by gueing loads of Black and White text and images that fit in the theme, on the covers. In this book I will glue the tipins in. Most of the pages have been cut away, leaving a small stub on which the tipin will be glued.
Labels:
ABEurope Group,
altered books,
B and W,
mixed media,
paper,
paper art,
tipins
Tuesday, April 10, 2007
Shortlisted again...
Every month, the photographer's website Ephotozine, organises a new competition. The theme of the month March was 'Paint It'. This theme seemed easy to me and I went to work.
In my workroom I set up a table and started messing with tubes and paint.
It seemed so easy, but it is hard to make a good picture of the paint coming out of a tube. Luckily I went digital some years ago and could try out any composition and angle I could think of, reviewing the frames on the camera and later on, on the PC.
I went for this picture which I liked best.
Since we could send in two images, I tried another setup with my used brushes, but I could not make a impressive picture. So back to my old archives. I choosed my 'Watercolour Lily' as second image and sent both in.
The result? The tube photo did not win anything, nor did the 'Watercolour Lily'. But this one got shortlisted though.
This is the second time that a picture of mine was shortlisted. Hope that once I will win the competition, instead of getting shortlisted!
Here is 'Watercolour Lily':
Sunday, March 18, 2007
Papermaking, part 2
Here are more pictures of my adventures in papermaking (see my previous post). In the picture above you see a little sheet that I pulled after I mixed the red and purple pulp in one vat. The colours did not mix completely, so I got this variegated effect.
When the sheet was still wet, I added the little (normal) pieces of paper. Just pressing them into the sheet was enough to keep them together.
Folding wet sheets after pulling gives a complete different effect than crumpling or folding dry paper. I hope to use pieces of this sheet in textural collages.
Anothere effect that I got after pressing the wooden stamp too hard in a thin sheet: it tore the paper. But I like it - now I have holes to sew unto fabric! I like the very rough edges of this sheet. The stamp was not inked, but it might be the old ink that was still in the wood that left the print.
There is so much what you can do when making your own papers. Here I layed out some fibers on a larger sheet and then couched a smaller page over it. Just a slight pressing and then waiting for it to dry!
I had so much fun trying out these ideas, and I think that I will come up with more ideas the next time...
Saturday, March 10, 2007
Papermaking - just a bit different
As a child I was always attracted to paper. There was some magic in a blank sheet, waiting to be written on, or painted on. No need to say that there is always some special paper in my collection. Often so beautiful, that I hardly dare to use it...
Of course I had to try some workshops papermaking, but did not have the mould and deckle and other tools to really start making it at home.
There are defintely different ways to make paper. In their book: Paper, Metal and Stitch, authors Maggie Grey and Jane Wild show how to use paperpulp in a very creative way. They inspired me to give it a try and explore the possibilities.
The picture above shows the results of wrapping threads around a plastic frame and then weaving through it to make a very, very rough screen. The frame was pulled through the paper pulp and the threads caught the pulp. This frame was then set apart to dry. Only then I cut the threads from the frame. The result is a form of a waffle-like textured paper.
These samples were made by pulling thick papers with a simple mould, made of plastic screen (the one that keeps insects outside). I then stamped an old indian hand carved stamp into the pulp. To keep the texture I did not press these little pages.
I used coloured paper to make the pulp: red and a purple. After working just with the red paper, I poured in some purple pulp. The colours did not mix, so I got a variegated effect! What a bonus!
Normally one would make paper without any holes. I guess, that does not apply to me. After pulling some 'normal' pages, I just went bored and started to make with a small stick and moving the pulp. The result was a pattern with texture as well.
For these samples I teared some wet papers that I had pulled in pieces, and wrapped them partly around a piece of thread.
All these samples will be used up in other projects. Within the next month I will participate in a 'True Colours' Fabric Book RR on the ABEurope Yahoo group. My colours are Red and Purple. So hopefully I can integrate some of these pieces into my book. Can't wait to paint, emboss and embroider them!
Tuesday, February 27, 2007
Editing photographs in Photoshop
I like taking photographs, but landscape photography is not really something that I can do well. I like to take shots when being on a holiday, but often I tend to take out a sketchbook and start sketching the surroundings. Maybe because sometimes I just feel lost in a landscape, or feel overpowered by the atmosphere. By sketching I can just pick out the things that I like in the scene and draw this - omitting the rest of the landscape...
But I think it is about time that I start doing something with all these landscapes that I have taken in the past. So here is a picture of last summer when we were in Bretagne.
In this part some of the houses are built near the rocks to keep them safe from strong wind and storms.
This photograph was cropped, the sky was replaced and the colours were turned into Black and White and then coloured in a cold blue tone.
The picture is very simple, but the textures come out very nicely, I think.
Wednesday, February 21, 2007
Secret Garden spread in Altered Book
Linda's book in the "My Own Theme" Round Robin is about secret gardens. She asked us what our secret garden would look like and express that in the spread in her book.
I love gardens, but are not so good in gardening - the weed is always winning in our garden... But I do have several ideas about how I would like to see my secret garden. To put all these ideas into the spread was impossible. So I used just some of the ideas.
I kept the spread fairly simple because of all the images that I wanted to use. It is mainly paint that I used plus I typed out the characteristics of that secret garden on our old type machine - much quicker than stamping these sentences. Just hope that Linda likes the spreads. This book is so inspiring!
Labels:
ABEurope Group,
altered books,
altered images,
mixed media
Monday, January 22, 2007
Samples
It has been a while since I worked with textiles - apart from handquilting an enourmous quilt which will take ages to finish. I really like stitching by hand. It is very relaxing.
Inspired by the workshop "Layering" taught by Cherilyn Martin, I decided to get going. My aim is at this moment to try out techniques and make samples, so no pressure for complete projects!
Here a piece of layered papers and paint, sewn to felt. Straight running stitches surround the little piece.
Easy and fun to do!
Thursday, January 11, 2007
Felt beads
It's been a while since I took some time to experiment and try new things. I have been to a workshop from Zijdelings by Cherilyn Martin called Layerings and tried some new techniques which I definitly want to explore further.
Today I managed to take some time to make beads from felt and cotton, winded with wire and embossed with embossing powder. The beads were then 'blasted' with a paintstripper ( I do not have a heatgun, and this seems to work as good as a heatgun). The acrylic felt melted partly away showing parts of the underlying fabric.
Now I need to find a way to prevent the cotton from fraying...
Subscribe to:
Posts (Atom)